Saturday, September 24, 2011

Project: Sticker Book

stickerbook1

Inspiration:  Do you remember having a sticker book as a child?  I know I had several over the years and collected many stickers.  They are long gone now, but as I already have a large selection of stickers saved for my daughter I wanted to find one for her.  Since all the stores I used to go to for them are gone and I couldn't find one I liked online, I experimented to find something that worked.  I also didn't want to use a traditional photo album (I remember using one of those for a while as a kid).  First I tried various types of paper (vellum, etc.), then I tried laminating and finally came up with one that works well.  We've been able to add and remove stickers and still have them stick to the pages.  I even made one for her cousin in Japan.

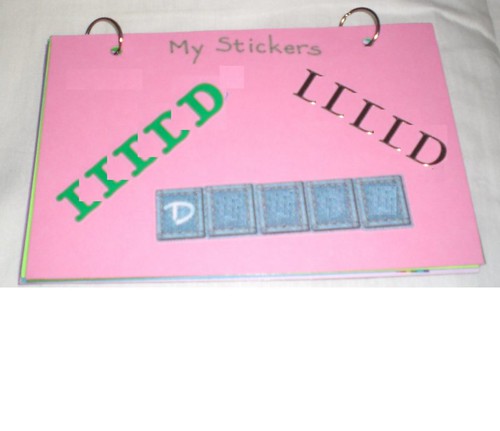
How I Make Them: I cut 6 half sheets of brightly colored paper so I'd have 12 pages including the front and back cover.  On them I added a few stickers and words using a Sharpee.  On the cover page, I wrote "My Stickers" and used stickers that spelled out the recipient's name.  On the back cover, I put a heart sticker and wrote "Love, Mommy" for the book for my daughter.  For her cousin's book, I used a US Flag sticker and wrote that it was from her cousins in the US.  Then I laminated each page using my Xryon laminator.  After trimming the lamination, I put the pages in order and added two hole punches to the top.  Finally, I used metal key rings to secure the pages together through the holes.

Alternatives:
  • You could use any sized or shaped paper since you're laminating it.
  • If you don't have your own laminator (mine's a sticker laminator rather than a heat-based one), you could go to a copy center or Office Max, Staples, etc. and get the pages laminated there.
  • I used key rings to hold the pages together but you could put them a 3-ring binder or use yarn to tie them together or use office rings (I didn't use these because I was worried the small girls might open them).
Additional Photos:

Tuesday, September 20, 2011

Card: Baby - Pacifiers

card_pacifier

Inspiration: This simple card was inspired by a shaped template.  I needed to make a card for a baby shower where no one knew the gender of the baby, so this is what I came up with.

How I Make Them:  As I mentioned, I had the shape in a template of baby-themed shapes.  I cut one in blue and one in pink.  I glue them to the card with ends intertwined.  Then on the inside of the card I write "Sending you wishes and prayers for a happy & healthy new bundle of joy!"

Alternatives:
  • You don't have to use pink and blue.  If you know the gender you can stick with gender-based colors.  If you don't, you could also use yellow and green or different shades of purple or even purple and aqua.
Additional Photo:
card_pacifierinside

Sunday, September 18, 2011

Card: Valentine's Day - Woven Heart

card_wovenhearts

Inspiration: Just like my woven star card for Rosh Hashana, I got this idea from an old arts and craft book.  Hearts are a simple shape and they look pretty neat when woven.

How I Make Them: I used another old scrapbooking die cut for the heart shape.  I either cut out one, trace the same die cut on the card and then cut slits in the card using an Xacto knife (version on the left of the above image) or I cut out two in different shades of the same color (version on the right of the above image).  I cut the cut-out hearts into strips and then weave - either on the card or just the two hearts.  I use a little glue to hold down each edge piece.  When I use two different hearts, I trim them when I'm done to neaten it up before gluing it down on a card.  On the inside of the card, I usually write a personal message.

Alternatives:
  • I switch off between using this card for Valentine's Day and Anniversaries.
  • There are still plenty of other shapes that could be woven - present (box, just add a ribbon after), circle (add a smiley face), etc.
  • I've toyed with using strips of fabric or ribbon too.