Monday, June 27, 2011

Card: Rosh Hashana - Wings of Shekinah

shekinahrh

Inspiration:  Almost 10 years ago, I took a short Hebrew Calligraphy course at the local synogague.  At the end of the course, we were supposed to come up with a project using calligraphy.  I'd always liked "B'ruchot Habaot" from Debbie Friedman's And You Shall Be a Blessing album.  While the imagery of the Shekinah is often a bird or a floating bride, I decided to use a butterfly.

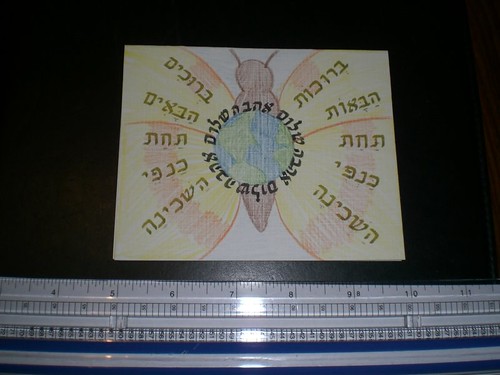
How I Make Them:  I made a small circle template with slots that I use to get the earth centered and to space out the hebrew words for peace (Shalom) and love (Ahava) around it.  I do all the calligraphy first, starting with peace and love around the earth and then the feminine (on the right side) and masculine (on the left side) versions of the prayer on either side of the wings.  I usually do the prayer in a brown or gold ink color and peace/love around the earth in black.  Then I use colored pencils to color in the earth (free-hand style on the continents though sometimes they don't always look like we know them to be).  Then I finish by drawing the outline of the butterfly with colored pencils and then color in the body and wings.  I typically use the yellow and orange for the wings shown here.  I also color some sky blue in the areas that would otherwise be white on the card.  On the inside of the card, I write the English translation "May be you blessed beneath the wings of Shechina."

Alternatives:
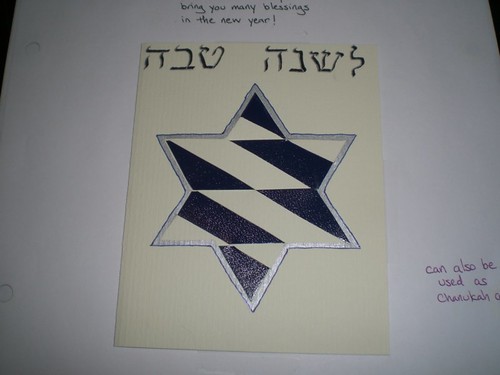
  • I've used this card for much more than Rosh Hashana.  It's sentiment is very appropriate as a condolence or get well card too.
  • I've also made larger versions that I've framed. 
Links:

Friday, June 24, 2011

Card: Rosh Hashana - Woven Star

starweaverh

Inspiration:  I actually found something like this a long time ago in a book of crafts and decided to try it out.  I think I made them with hearts first (for anniversary cards and I'll post some of those later since I'm making more now).  I decided to use it with stars one year to see how they would turn out.

How I Make Them:  I use an old scrapbooking die-cut and trace the star shape on the card and on blue colored paper.  I use my Xacto knife to cut out lines on my card going just beyong the edge of the shape's lines.  I cut my blue shape into strips with scissors and then weave the pieces onto the card.  The card in the photo above had lines cut on the card at a diagonal and the blue shape was cut horizontally (or maybe it was vice versa - hard to tell from the photo).  I glue down the ends.  After it dries I outline the shape with marker (silver Sharpie and blue gel pens for the one above).  In this version, I calligraphied L'Shana Tovah in Hebrew letters.  On the inside, I wrote "May your family and friends bring you many blessings in the new year!"

Alternatives:
  • As mentioned in the previous post, cards with Stars of David can be used for any Jewish Holiday or Occasion.
  • It might be fun to try different materials for the weaving like ribbon or fabric.  Just make sure the material is sturdy enough (tissue paper would probably rip too easily).

Wednesday, June 22, 2011

Card: Rosh Hashana - Cut out Star

starcutoutrh

Inspiration:  I had purchased some tissue paper for another project and had lots leftover.  I'd also been toying with the idea of stained glass and how to incorporate that into a card.  I decided to cut out a Star of David shape but make it a little less typical (thus the resulting skinny star) and use the tissue paper to fill in it.

How I Make Them:  I actually ended up making a template of the front of the card for this one so I could get the star shape the same (or pretty close to the same every time).  I trace my star cut it out using an Xacto knife.  I trim the edges with scissors to make them rounded.  I choose 2-4 colors of tissue paper and cut small thin rectangles.  I put some glue on the inside of the card (while it's open) around the edge of the star and then slightly overlap the tissue paper (if I need it, I add a little glue to help hold down the overlapped parts).  On the version pictured above, I wrote "L'Shana Tovah" (a good year) with a silver Sharpie and then outlined it with a gel pen.  Sometimes I use my calligraphy nibs and ink for this.  For Rosh Hashana, I write "May you have a year filled with beautiful blessings" on the inside of the card.

Alternatives:
  • These stained glass stars also work well for Chanukah and any other Jewish occasion like a Bar or Bat Mitzvah (especially thoughtful if you match the tissue paper to the colors on the invitation), Confirmation, Pesach (Passover), Jewish Wedding, and others.
  • Just like with my faux-stained glass decorations, you could also use crayon shavings trapped in wax paper (don't forget the cloth when you use the iron).
  • Small silk painted pieces could be used too.
  • If the star was large enough, it could be a photo-frame card.

Monday, June 20, 2011

Card: Rosh Hashana - Shofar

shofarrh

Inspiration:  Rabbi Enid Lader's song "The Sound of the Shofar" always pops into my head whenever I think about Rosh Hashana.  It's simple and fun.  This card was designed with this song in mind.

How I Make Them:  I use a scrapbooking template to make the music notes and and I usually just cut out the shofar by hand (no template, though it would be easy to make one).  I usually make the shofar in a dark yellow.  I glue on the shofar with the notes above it and then using different colored gel pens, I write in the sounds that the shofar makes as described in the song - "Te'kiah!", "She-varim!", and "Te'ruah!"  On the inside of the card, I write "May the sound of the shofar usher in a year of peace for you and all those you hold dear"

Alternatives:
  • A musical staff could come out of the shofar and the words could be written like notes on it.
  • Just a large, more ornate Shofar could be used as the image.

Saturday, June 18, 2011

Card: Rosh Hashana - Open Book

bookrh

Inspiration:  It is a very traditional belief in Judaism that during the time between Rosh Hashana (the Jewish New Year) and Yom Kippur (the Day of Atonement), you need to be on your best behavior so that your are included in this year's "Book of Life".  As a greeting, many Jews wish each other that they be inscribed in the book.  I've drawn this open book shape since elementary school and thought it would be a good way to incorporate it.

How I Make Them:  I made a template of the book pages which I usually cut out of parchment paper (or paper made to look like parchment paper).  I draw lines in pencil and then use india ink and a thinner calligraphy pen nib for the words, "On Rosh Hashana, it is written." and "On Yom Kippur, it is sealed."  After the ink dries, I erase my pencil lines.  I cut out a rectangle in colored paper, glue it to the card and then add the book.  I draw a dark line using a gel pen to mark the binding in the middle of the book.  On the inside of the card I write, "May you be inscribed for a year of peace, health, and happiness."

Wednesday, June 15, 2011

Card: Rosh Hashana - Apple

applerhorteach

Since we're already on apples...

Inspiration:  I wanted to do a shaped card with the apple and ended up with this.

How I Make Them: I ended up making my own template for the apple, stem & leaf.  I store them in the computer keyboard themed envelope you see in the photo above.  The apple template actually has the whole overall shape and I use that to trim my card first.  Then I cut out my shapes - red for the apple, green for the leaf and a dark brown for the stem.  I glue on the stem, leaf and then the apple.  I don't write anything on the apple but inside I write "Wishes for a sweet new year!"

Alternatives:
  • I still want to do one of the inside of the apple one day - looking down on the apple and seeing it's seeds make a star shape, but that might not be enough.  Though I guess if I did a bird's eye view of the apple on the front of the card and then the seeds inside the card it might work.
  • The apple shaped card might make a nice Thank You card for a teacher.

Monday, June 13, 2011

Card: Rosh Hashana - Apples & Honey

applehoneyrh

Although Rosh Hashana isn't until the fall, this is the time of year that I start working on my cards for that season.  So I'll share a few designs I've used over the past years in the hope that they inspire an idea of this year.

Inspiration:  Apples and honey are a traditional snack to wish one a sweet new year.  This is actually one of the first card designs I came up with when I first started making my own cards.

How I Make Them:  I made a little apple template the first time and I always cut them out of a smooth red paper.  I also made a template for the jar and it's lid.  I try to keep the jar to a golden yellow color but switch between brown, gold and shiny silver for the lid.  After gluing on the pieces, I hand-draw the word (or at least part of the word) "Honey" on the jar and add "L'Shana Tovah" which means A Good Year.  On the inside I write "May your new year be sweet!"

Alternatives:
  • Sometimes I write a little rhyme instead on the inside but I can't remember the exact wording right now.
  • I'm thinking about doing a card and adding the little honey dipper too.

Tuesday, June 7, 2011

Supplies

penbox
After reviewing a product and a resource I use, I figured it was time to show you some of my supplies for card making.  The above picture is most of what I keep in my pen box of crafting supplies (except the colored pencils because they don't fit).  I'll give a short description of each item in order clockwise from the left.

Colored Pencils:  These are a 24 pack by Koh-i-noor.  I like these because they aren't wood coated and they color very smoothly.

Purple Plastic Ruler: This is a pretty cheap little ruler that I use - I think I took it off of a plastic clipboard that I got.  The size is good for working on my cards, but I have cut it a few times with my eXactO knife so I doubt the lines are super straight anymore.

Pencil Sharpener: I use this one mostly for my colored pencils since all of my lead writing pencils are mechanical.

Scissors: I actually keep 2-3 different sizes of scissors in this case, but took the others out so the picture wouldn't be too cluttered (though it probably is anyway).  I do make sure that I use my crafting scissors only on paper (and my sewing scissors never touch my paper!).

Eraser: This is the little smiley face - I bought a big container of like 200 of these years ago and am still working my way through it.  I like the small size for getting in close to inks and colored spots with less likelihood of smearing (though sometimes I still do).

Metal clip:  the loop shaped clip that I use for folding my card stock to make a nice strong & clean crease.

Small paint brush: I use this for quickly brushing away eraser residue when I need to erase reference lines I made for lettering on cards.

Hole Punch: I use this for creating very small circles for cards or to make holes to attach paper inside a card (like I did for my daughter's birth announcements - 2 holes and then ribbon strung through the holes on the inside of the card and the paper with the text)

Glue: see my note about Glue from 3/18/2011.

Pens, Markers, Mechanical Pencils:  This includes small Sharpies, various mechanical or tip changing pencils, gel pens and Crayola markers for writing text and some coloring/decorating on the cards.

Sunday, June 5, 2011

Resource Review: Calligraphy Alphabets Made Easy

calligraphyalphabets1
This short review is of Calligraphy Alphabets Made Easy by Margaret Shepherd.  I bought this book because I thought it would be neat to try out different styles/fonts of alphabets for practicing my calligraphy.  I've actually gotten quite a bit of use out of it for finding interesting fonts to use for my cards.

The example letters are fairly clear and the book has a very nice variety of alphabets.  It does give little arrows around the letters to show the strokes (sometimes numbered with the order) but most often I just use it as an overall visual and try to re-create the letters my own way.

calligraphyalphabets2
The pages above give an example of what the alphabets look like in the book.  This pair of pages actually shows more traditional alphabets (many within the book are not).  I used the camellia alphabet shown on the right for the anniversary cards I made in this post.  I've also used other ideas from this book (like a font for Valentine's Day that uses arrows in the letters which I'll post about later).

So if you're looking for a good reference book for alphabets/fonts, I highly recommend this book!

Friday, June 3, 2011

Product Review: Xyron ezLaminator

ezlaminator
I've mentioned my ezLaminator in several posts now so I thought I should write a short Product Review about it.  So here goes...

I got my ezLaminator as a gift from my mom.  I'd been thinking about getting a laminator but I was looking at heated/electric ones and at the time they were way out of my budget.  At the time (this is probably close to 8 years ago), I think my mom paid around $50 for it (I'll post some links to ones on Amazon so you can get an idea of current prices).  As you can tell from some of my previous posts, I still use it quite a bit.  I laminate most of the bookmarks I make, flashcards, and the decorations I make from old calendar pages for our Sukkah in the fall.

The Xyron ezLaminator is a cold seal laminator.  It doesn't use electricity to run - it's a hand crank.  And it doesn't use heat, which is nice if you want to laminate something that already has a little bit of coating on it so it doesn't melt it and distort the image.  The cold seal is basically a very strong adhesive (at least to itself and to paper). 

Likes:
  • Quick & convenient
  • No electric & no heat
  • Easy to use
Dislikes:
  • Sticker based so it leaves my scissors with sticky goo to remove
  • Refill cartridges are often difficult to find in retail stores or a little pricier (haven't done the cost comparison but it might actually be less expensive to just take my lamination pieces to OfficeMax and have them done there)
  • Size limitation (sometimes old calendar images are larger than what I can feed through the machine)

Links:

Wednesday, June 1, 2011

Card: Birthday - Dinosaur

e36_dinosaurbday

Inspiration:  I needed a card for a little boy who loves dinosaurs.  I'm not the best artist in the world but with the help of looking at some images on-line I came up with this one.

How I Made Them:  As with many of my cards, I made templates so I can make this one as many times as I need.  I started with the main body and legs.  I also created small templates for the plates on the dinosaur's back and tail.  I glue the body down first and leave a small part of the tail unglued so one of the spikes can sit under it.  Then I glue on the plates and then the 2 spikes.  I draw in a little eye and write "Happy Birthday" on the card.  On the inside, I wrote "This dinosaur joins us in wishing you a special day!"

Alternatives:
  • An invitation for a dinosaur-themed party and/or a thank you card after the party.