Saturday, December 22, 2012

Craft Project: Princess Sash

Sash3

Inspiration: I wanted a craft for my daughter's Princess themed birthday party but since we had already purchased tiaras from Oriental Trading, I had to come up with something else. I had originally thought to do sashes with materials but the more I thought about it, the more I realized that the paint could stain and would take too long to dry. My husband mentioned making paper sashes at school as a kid, so we gave it a try one day with our daughter and liked how they came out.

How We Made Them:  Before the party, I used a large roll of white butcher-style art paper to cut long strips (folded over once to make them a little thicker).  I took two strips and angled the ends together so they overlapped with a diamond shape.  I stapled the diamond together and used white mailing labels to cover both sides of the staples (so they wouldn't pull on anyone's clothing).  I folded creases around the top to help when we put them on the girls and labeled the bottom of the creased area "Rt" to remind me that they go on the kids right shoulder.  On the side that would be the front, I used a black Sharpie to draw a crown and then wrote each girl's name in large block letters (the example in the photo was without a name).

Sash1
Closed up of the finished top.

Sash2
The sash before coloring.

During the party, we had crayons and stickers out for the girls to decorate them.   When they finished, we put them over their right shoulder and held the lengths together near their left hip and then stapled the paper together with 2 staples (if we needed to we covered the staples with white mailing labels).

Alternatives:


  • I would have liked to have time to trim the length down for each girl and maybe cut in a V to make the ends look more like ribbons.
  • I've seen some websites where kids make them with brown paper bags and then design "badge" stickers like a Girl Scout Brownies sash.
  • This idea would also work for a pageant themed party.

Saturday, December 15, 2012

Party Decorations: Banner & Shield

Banner1_ShareShield1_share

Inspiration: For my daughter's Princess Birthday party we wanted to add some more castle-like decor and signs.  I had read where someone had made some large banners and hung them near an entranceway.  So we did something similar as decoration.

How I Made Them:  I used a large roll of paper I got at Hollo's and cut out 3 large sheets.  From two of them I cut a shield shape - rounded to a point at the bottom and three points at the top.  The last one, I notched at the top to look like a banner and scalloped the bottom.  I hand-drew a castle on the shields with the words Castle above it.  I color one and our daughter colored the other one with help from her grandpa.  For the banner, I added the text "Princess D*'s 4th Birthday" and a crown.  I colored the scalloped edge to look like strings and then cut little slits all along the bottom edge to make it really seam like a strip of strings.  The shield I colored we hung outside so the guests would know that this was the Castle.  The other shield was in the hallway and the banner was in the dining room where the cake was going to be served.

Alternatives:

  • If you'd like a sewing project instead, shields and banners could easily be done using felt.  Felt can even be used attached to a board and then pieces of felt on them could be changed since felt often sticks to felt on it's own (at least for short periods of time).
  • I know Oriental Trading Company has cardboard shields that you can buy and then decorate.
  • You could also make these using foam board and foam pieces.

Sunday, December 9, 2012

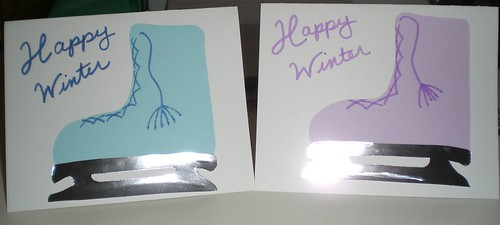
Card: Winter Ice Skate

WinterSkate1

Inspiration: I've had on my idea list for a while to do an ice skate card. I decided this was the year since I wanted to do a series for the seasons starting with Winter.

How I Make Them:  I used the template that I use for the Birthday Roller Skate Card to make the boot.  I made a new template for the blade.  I cut the boot using either a light blue or light purple.  The blade I used metallic silver paper.  I glued the boot on and then the blade.  I used the Martha Stewart Glitter Pens to add laces with a tassel and "Happy Winter".  Inside I wrote a little verse of impressions of winter:
     Glide through the streets
          where the snows
     Glisten and sparks
          in the light as we
     Gladly celebrate and share
          happiness.

Alternatives:

  • The boots can be in any color, might be cool to use a vinyl paper or a print fabric.
  • I've thought about making a card with a pair of skates dangling by their laces.

Thursday, December 6, 2012

Party Game: Find the Shoes

ShoeCloset1

Inspiration: Every year at my daughter's birthday party, we play a game where I hide around 20 images of something related to the party around our living room and the kids find them. They have a blast and we usually play this 2 or 3 times.

I started this game when I worked at a Day Care Center while in High School. I'd cut out shapes related to the time of the year and number them on the back (so we were sure all of them were found). The 3-5 year-olds I worked with thought it was the best game and would even pick up the toys in record time so we can play.

This year her birthday theme is Princess so I thought I'd take a page from Cinderella and use shoes.

ShowCloset2

How I Made Them:  I found a picture of a high heel by doing a Google Search.  I used Word to print it so I could make it the size I wanted (about 2 inches tall).  I used this printed image to make a template with a piece of paper and then traces pairs of them on different colors of paper.  I cut them out and then laminated them with my Xyron Laminator.  Finally I put 1/2 circle velcro stickers on the backs.

For the closet, I took a book cover (the hardcover part of a book) that I found at Hollo's Papercraft.  They had a bunch of choices for color, but I decided to go with white since the others were so dark.  I glued on a piece of tan paper cut to fit on each side and added dark brown shelves - 5 on each side.  Then I used the other 1/2 circle velcro sticker to attach the shoes.  The velcro means they come off the book.  I attached the soft velcro side to the shoes so they aren't rough when held by little hands.

To finish, I decorated the front of the book with "Ye Royal Shoe Closet", a crown and a large shoe.

Alternates:

  • For her Dora party, we hid baby animals from a book - I think they were Marmosets.
  • For her animal birthday party, we hid animals (we still play with these).
  • I've also done shapes based on seasonal images (leaves, snowmen, umbrellas, flowers) and holidays (dreydel, colorful eggs, hearts, shamrocks).
  • You could even get the kids to help you make the shapes or at least decorate them.

Monday, December 3, 2012

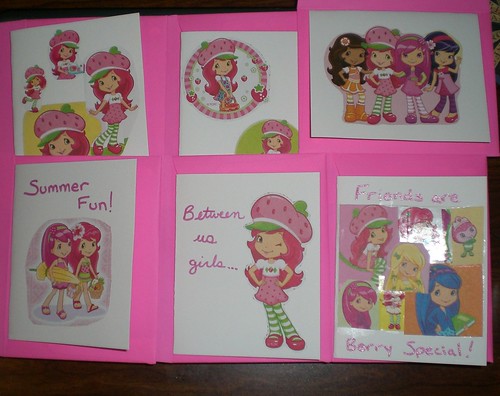
Cards: Strawberry Shortcake Stationary Set

SSCards

Inspiration: My daughter loves Strawberry Shortcake.  She's almost 4 and she always wants pretty stationary for writing to her pen pal.  Since we cut up her first few issues of Strawberry Shortcake magazine so she could hang the posters on the walls of her room, I kept some figures cut out to use to make stationary for her.

How I Made Them:  They're actually pretty simple.  I just took the cut out images and used Modge Podge to adhere them in different ways.  For things like this, I avoid my Elmer's School Glue because it tends to make the images wrinkly when the paper is too thin.  I used to use Rubber Cement but I don't have any so I used the Modge Podge which seems to be working pretty well.  I added some text based on the pictures using the Martha Stewart Glitter Pens.  And finished them up with neon pink envelopes.

Alternatives:  You can use any character or item you can cut out.  Have fun!  I have a few Sunday comics I've been saving to do some others.  I tend to use things like this for just everyday stationary but it could easily be adapted for any occasion.