Thursday, August 25, 2022

Review: DIY Felt Flowers - Sunshine Mini Wreath Craft Kit

I've admired the craft kits listed by thehandmadeflorist on Etsy for some time.  A couple of months ago I finally took the plunge and purchased one to make.  When it arrived, I was just so busy that looking over the instructions felt a bit overwhelming so I put it aside for a bit and recently got back to it.

The kit itself came very nicely packaged.  All within a slim box with a nice labeled wrapper around it.  The instructions are in a full color booklet and everything was very neat and organized in the box.  It was easy to locate each piece and the booklet helped to identify everything.

I started by cutting out all the pieces.  Really appreciate the template page and how the kit suggested laying out the pieces from the felt to ensure you had plenty of felt for everything.

The steps in the booklet laid out tasks nicely too.  I was easy to finish a part and then come back to do the next task at a later time.  I ended up working on this in small segments over a 2 week period.

I think the hardest piece to put together was the sunflower but it was also the most fun.    Since I don't have a glue gun (I always make a mess of them and eventually they stop working for me cuz I'm just not good at taking care of them), I used E6000 adhesive instead.  It meant sometimes having to be a little patient when waiting for glue to dry and having to hold pieces together a little longer.  To hold the wound up center of the flower while the glue dry, I used a velcro cable tie.  I found I could use alligator clips from a tech kit to hold the petals for me as they dried (see image).

Felt Petals held with alligator clips

felt sunflower

The finished project looks so pretty and is going to be a great sunny addition in my home office.  I'd definitely recommend any of kits from this Etsy shop.

Felt flower wreath


Tuesday, July 26, 2022

Salesforce Character Cards: A Shared Document

Last week, I was privileged to get to lead a crafting session at the WITness Success Conference in Minneapolis.  I prepared kits for attendees to craft their own cards showcasing Astro Nomical, Cloudy the Goat, Ruth the Elephant, Hootie McOwlface, or Codey the Bear.  We had a good time.  I didn't get to share the slides I'd prepared but we had great discussions as we crafted.  To end it all, I made a document with all the templates of Salesforce Characters I've created available.  You too can create some cards with Salesforce Characters using the embedded document below.  If you make a card, please share it in social media using the #craftforce tag.  Thanks!


Monday, May 9, 2022

Card: Meditation Astro (Salesforce Character)

Meditation Astro card


Inspiration: There's this pin I got at Dreamforce '18 of Astro.  They're sitting criss-cross apple-sauce with eyes closed.  Astro looks so calm and peaceful.  There are just too many times when I look at it that I wish I was that relaxed.  I like the idea of wishing others that level of peace and calm through a card.

How I Made It: As I often do when creating projects based on these characters, I Google'd for the image I wanted and printed off multiple copies of it in the size I needed (I typically work with a 4x5 inch card).  I use this printed image to cut out the pieces I think I'll need to make and trace their edges onto card stock to create a template.  On the template pieces I note what the part is and what color paper I think I want to use for it.

template


Once my template is set, I cut it out and layout it out to make sure I have all the parts.  Then I use it to trace and cut out paper in the colors I want to use.

I glue everything together and onto the card.  I finish up with some drawing in markers (Astro's closed eyes for this card) and add in some background if inspired to do so.

My card really isn't complete until I add my LBK Card Creations on the back.

Alternatives:

Meditation Astro


  • I made a version with some cool patterned paper I picked up at Hollo's.  I want to find other neat paper to see how interesting I can make Astro.
  • I used this image of Astro to draw a little girl meditating for my daughter's Bat Mitzvah service book - I should totally make these into cards too.


Saturday, May 7, 2022

Learning to Quill

I've always admired the cards I've seen that were made with quilling.  So much details and it looks like lots of work went into making them.  I thought I'd give it a try to see if it's something I would enjoy doing.

I did some Google Research and then set out to pick up some simple supplies at my local crafting store.  The supplies were fairly inexpensive and I found the paper strips in the clearance aisle (so way discounted for my first attempts).

I used what I'd learned from reading and watching videos for my first attempt:
Quilled Star in silver, pink, blue, and purple

I think it turned out pretty good for a first attempt.  The biggest issue for me was that the silver colors teardrops used paper that was thinner than the colored paper used for the rest.  I also learned that starting from my star endpoints and working my way towards the middle of my shape was not really a smart method.  

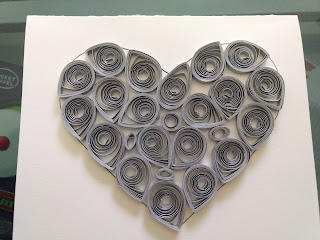
So I tried again.  This time just using the silver paper (the thinner felt easier to work with).  I ended up with a pretty nice looking heart.
Quilled Silver Heart

This time I start from one side but still ended up with some gaps and filled them in with odd little shapes.  I was also using the entire strip and was wondering how changing the length of the strip might work for projects.

I found this blog post and used the suggested worksheets to get some practice with different strip lengths.  Then I felt ready to do some more cards.  I also watched some videos with different shapes like this one that showed 35 different quilling shapes.

I wanted to use up the thicker paper and made some Egg-Shaped cards (sorry, I forgot to take pictures of them) and gave them to neighbors for Easter.

I picked up some more colors of the thinner paper and made the rest of the cards shown below.

Quilling is fun.  It relatively inexpensive.  My only worry is mailing the cards I made - I don't want the postal machines to smash them.  So I think I'll stick to using this for cards that I know I can hand-deliver.

More Cards I Made:

Left Side: Card with 5 tulips, Right Side: rainbow like a young child would draw
Left Above: 5 Tulips
Right Above: A rainbow - young child style


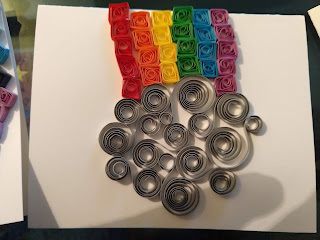
Quilled Cloud with Rainbow
I liked the cloud swirls and making the squares in the rainbow but I have might have gone a little overboard with how many colors.

Quilled Cloud with Rainbow

This was an attempt to reign in on the colors but it still wasn't quite to my liking.


Quilled Cloud raining colored drops
This is what I finally ended up at - an cloud raining colored drops.

Wednesday, April 13, 2022

Card: Cloudy the Goat (Salesforce Character)

Inspiration: I've already made cards and have templates for most of the main Salesforce Characters (Astro, Codey, Hootie, Ruth).  I felt I needed to do one for Cloudy who represents Salesforce Administrators.

How I Made It: Like most of these, I started from an image of the character I found online.  Resized it to fit the card size I usually make and printed a few copies.  Then I cut out the different parts (or what I viewed as the different parts) and created a template.


Then I cut out the template and created pieces in each designated color.  I used white for the body, head, and right front leg.  I used brown for the 2 antlers, and black for the 3 hoofs.  Once all the pieces were cut out I glued them together onto a card (I used a light green for the card since I figured a mostly white character shouldn't be on a plain white card).

After gluing it all together I used a pink gel pen to draw Cloud's smile and a black Micron to draw the eye.


Alternatives: I guess I could have used a white card if I was going to draw/color a background.  I could also work on creating some kind of costume for Cloudy to wear (maybe).

Sunday, April 10, 2022

Card: Ruth (Salesforce Elephant)

Inspiration: I've made card-versions of few of the Salesforce characters.  Since I'm working on a crafting event for a local Women-in-Tech (WIT) group, I thought it might be a good idea to have one for this very popular character representing Architects.

How I Made It: I started from an image I found of the character online.  She has her right arm raised up and is wearing her typical outfit (paint splotched shirt, jeans, tennis shoes, pearl necklace).  I printed multiple copies of the image in the size of the card I typically make (4 inches by 5 inches).  Then I cut out parts and used them to create a template.


I cut out my template and then traced on the colors of paper marked.  Gray for the body, ears, arms, and tail.  White for the shirt.  Blue for the pants. Pink for the cheeks. I chose a shiny black for the shoes (so she ends up wearing patent-leather flats rather than tennis shoes). 

On the shirt, I used markers to color in the paint splotches.  Then I started to glue all the parts together.  I used a shiny light blue gel marker to draw in the pearl necklace after gluing on the shirt.  The last part was to use a black marker and draw in the eyes and lashes.


Alternates:

I didn't add much to this card, other than coloring in grass and sky.  Since I'm making a bunch of kits for others to make their own versions, it'll be fun to see how they embellish and add to it.

Monday, March 7, 2022

Review: DIY Steampunk Robot Felt Kit

A friend and I found this adorable Steampunk Robot Felt Kit on Etsy.  I purchased two kits so we could both make one as we crafted together.  

It took us 4 sessions ranging in time from 1 to 2 hours to make the kits completely.  The kits provided all the supplies needed except scissors, needle threaders (we're just getting old is all that proves), and the stuffing.  There was plenty of felt and thread provided in the kit (even when we had to cut a couple of new pieces due to sizing issues).

I'm sorry I didn't think to take pictures along the way but here's the finished robot I made:


The instructions provided were mostly well written but I'm glad they provided images too.

We started our first session by cutting out all the pieces (we shared the provided template page so we didn't have to cut up two of them).  Once all the pieces were cut, we starting on assembling and sewing with the provided directions.

It took me a little to get used to sewing and opening to make robot 3D.  Sewing the knobs on the head took a little bit of hand coordination.

I had initially made the arms and legs a little too loose so I detached them and tried again to get them looking more like I imagined they would.  

Finishing the small boxes for the hands and feet since one edge was already attached to the arms/legs was also a little difficult.

Closing up the head was harder than closing up the body.  I think this was mostly because I was also trying to work around the already attached knobs along with it being smaller than the body.

The very last part was sewing and then attaching the hat.  Making the hat itself wasn't too bad.  Though we had to re-cut the side piece and the bad because ours were not long enough for the circle used for the top (I don't know if that was an issue in the pattern or if I used the wrong pattern piece when I initially cut it out).  Attaching it to the head was difficult because you had to sew through the hat and also make sure you caught into the head.  I also think the brim on the hat needed to be a little wider but we make it work.

Final thoughts: Our Steampunk Robots turned out very cute, however I don't think I really like doing more 3D Felt crafting.  I think I'll stick with my mostly flat ornaments that I simply stuff to give them a little loft rather than doing full out 3D projects.